Tips for using Powerpoint to Record an Instructional Video
In this instructional guide, we will discuss how to utilize PowerPoint's Cameo feature to embed a talking head directly into your slides. We will also provide useful tips on how to successfully create an instructional video. If you would like guidance or support on any of the content covered in this guide, please don't hesitate to contact DFI, we're happy to help!
When creating your PowerPoint, feel free to utilize one of DFI’s powerpoint templates:
Tips for setting up your Instructional Recording
Tip 1: The Technical Setup (The "Before You Start")
- Aspect Ratio: Always use 16:9 (Widescreen). Instructional videos are almost always viewed on screens that fit this format.
- The "Speaker Zone": Faculty should leave space on every slide for their “talking head” (e.g. the bottom-right corner), so their face will not cover their content.
- Accessibility: Use high-contrast colors (e.g., dark blue background with white text, or white background with black text).
Tip 2: Content Design (Cognitive Load)
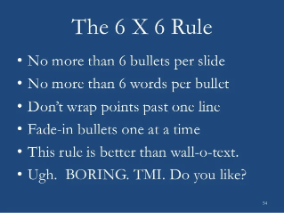
- The 6x6 Rule: No more than 6 lines of text, and no more than 6 words per line. In videos, "less is more" to prevent the student from "reading" instead of "listening."
- Font Size: Try to use a larger font size. Many students watch videos on smartphones; anything smaller is unreadable.
- Script: Type your full script (or detailed bullet points) into the Notes field at the bottom of each slide. When you click the Record button in Microsoft 365, your notes will appear at the top of the screen, right next to your webcam.
Tip 3: Tips for Recording
- Clothing Choice: Not to wear the color of your background.
- Looking at the Camera: A slide reminding them that the "audience" is the camera lens, not the laptop screen.
Instructions on how to get started
Utilize the following step-by-step instructions to get started with recording your own instructional video using PowerPoint:
FAQs
Utilize the following FAQs to troubleshoot any issues you may be having.